-R(150px).jpg?width=100&height=100&name=Six3_box(red)-R(150px).jpg "logo")
Installing traditional ceramic tile for large multifamily apartment renovations and other rapid repair projects can be a challenge. Why? Because ceramic tile installations require considerable time, effort, and expensive talent. For large-scale projects, Six3Tile is the way to go. It’s a new tiling solution that utilizes panels instead of individual tiles and reduces maintenance complexity for installers and building managers. If you want to know more about this innovative solution, this is the article for you. It’s time to get familiar with Six3Tile’s Pro Kits and how they turn traditional tiling on its head.
What are Six3Tile Pro Kits?
Six3Tile’s Pro Kits are a tile product that creates the look of high-quality ceramic tile without all the fuss. We’ve put our backsplash solution in a basic kit to streamline ordering - Got 500 units? Order 500 kits. If you have 200 backsplashes to update, order 200 backsplash kits.
Each kit contains the right amount of Six3Tile panels which have a combination of pre-cut patterns and quick installation processes that make property and maintenance managers' lives easier. The patterns are modern and fit in perfectly with most home décor styles. What’s more is that Six3Tile panels are flexible, lightweight, and sturdy, making full backsplash installs possible in a fraction of the time a ceramic tile install would take. And the results are professional and indistinguishable from traditional ceramic tile.
We pre-cut each tile panel into the selected pattern so that a single panel looks like many individual tiles. Not having to install tiles one by one saves you time on installation and ensures consistent grout lines and tile alignment for a professional look every time. This applies to all the tile patterns we carry and custom-made for clients – from subway to hexagon to herringbone.
Our Backsplash Pro Kit is ideal for both new construction and the rapid renovation of existing properties, whether they’re occupied or not. There’s no need to relocate tenants during a Six3Tile installation. All you need is an hour!
What Comes in the Six3Tile Backsplash Pro Kit?
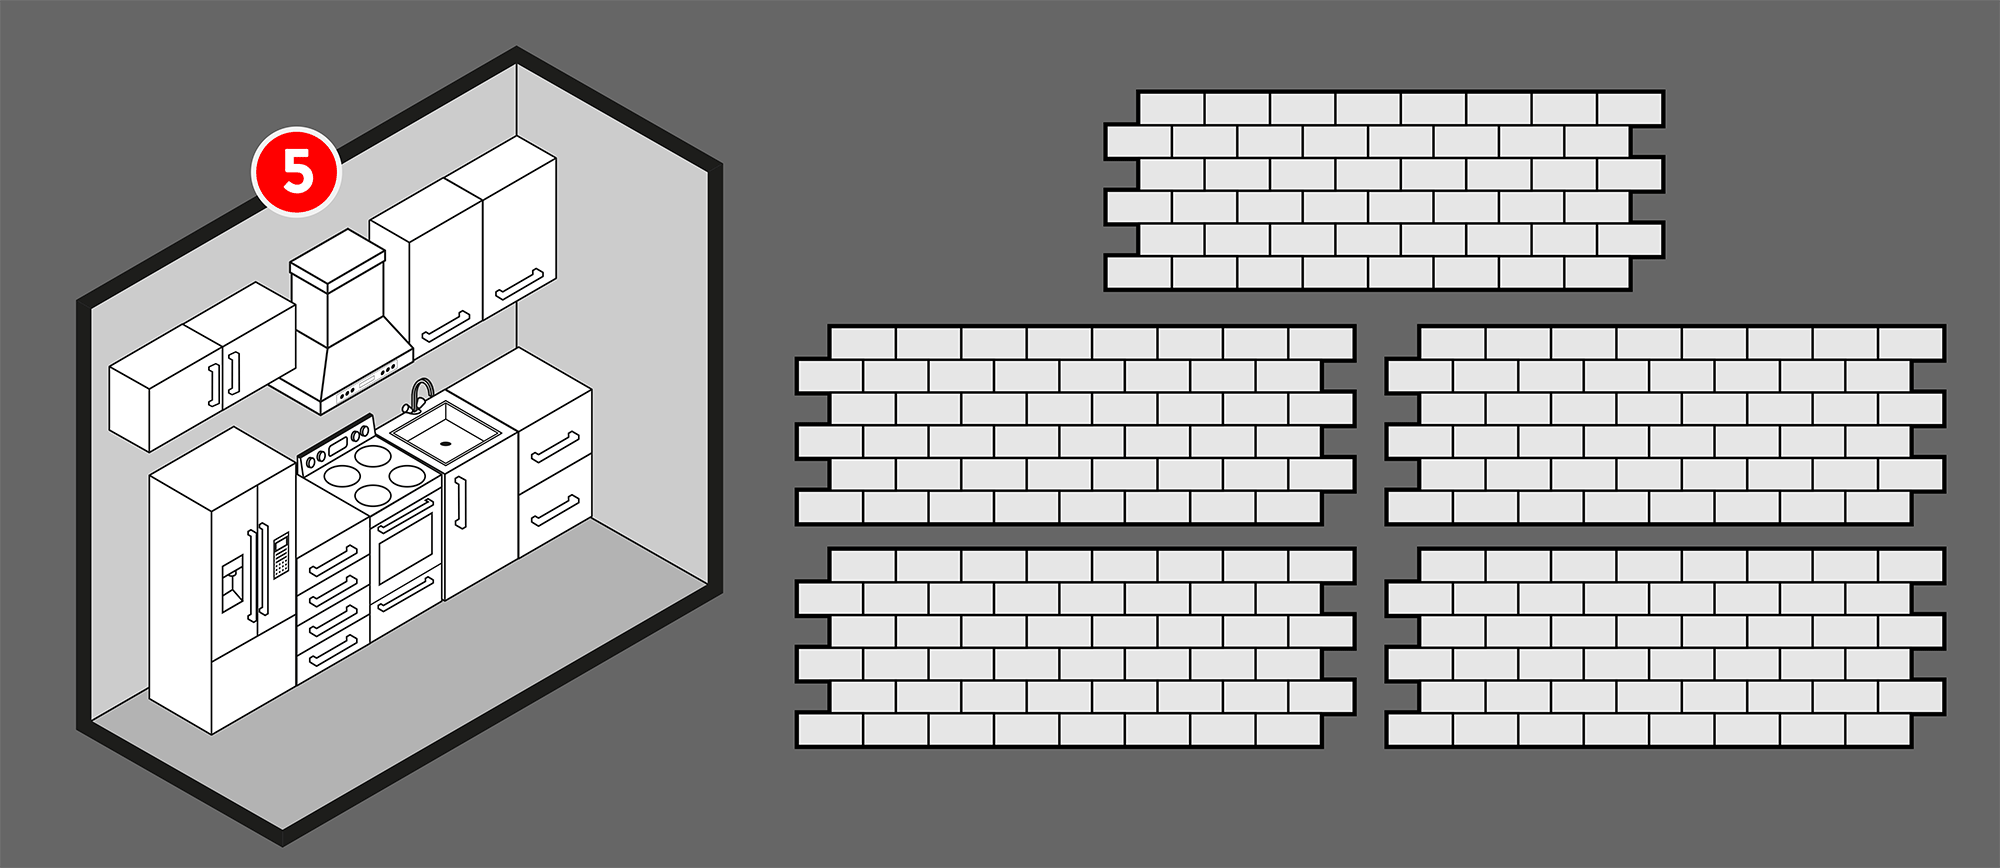
When you receive your Six3Tile Backsplash Pro Kit, you’ll get 5 tile panels. Each of the panels covers about 6 square feet and measures 19” high by 47” wide. They have been pre-cut to be mounted under the industry-standard kitchen cabinet height. Whenever you’re working on a non-standard space, you can cut your panels to fit perfectly.
Each of our kits comes in its own box, which makes it easy to track your inventory, assign units, and store them in the short term and long term. Six3Tile requires inventory to be stored indoors and lying flat.
You can also use the QR code (located on each box) to quickly and easily access installation instructions.
.jpg?width=1500&height=605&name=Ferg_Backsplash_Final_04032023_r02(blog).jpg)
How Much Coverage Should You Expect with Your Backsplash Kit?
One of the most commonly asked questions we get about our kitchen backsplash paneling is, “How much area does it cover?” The short answer is that each 5-piece kit contains 30 square feet. From another perspective, you get 18.5 linear feet per kit.
Installation at Unbelievable Speed
When installing in a multifamily project, time is money. That’s why we engineered Six3Tile to save you tons of time. Here’s how:
- No complicated processes or specialized tools. Literally anyone can install panels and get a professional result. So, there’s no need to find, hire, and schedule an expert ceramic tile installer. That saves you time and labor.
- Quick Surface Prep. You don’t have to do much, if any, surface prep before installing Six3Tile. It can be installed over moisture-resistant drywall, regular drywall, cement backer boards, or existing ceramic tile. On top of that, the installation surface doesn’t have to be finish quality – just make sure it’s clean and solid. Because Six3Tile is forgiving, it will flex to slight wall deformations and cover up small holes (smaller than a quarter; for anything larger, we recommend patching).
- Easy Cuts. When it comes to cutting the tile, you can use either an oscillating saw or a circular saw. For more precise, intricate cuts, you can use a utility knife. We recommend you use an oscillating saw or utility knife to cut access holes for light switches and fixtures.
- No-wait grouting shaves time off your installation. You can begin grouting right after you get the tile mounted – no waiting for the tile adhesive to set. Grout the tile just like you would traditional ceramic tile. Use unsanded or non-sanded grout.
Precision Without the Effort
The beauty of Six3Tile’s Pro Kits is its interlocking pattern that allows for precise installations without wasted time or effort. To attach the tile panels to the wall, you’ll apply either construction adhesive or Type 1-mastic to the back of the panel and then mount it. You’ll use tile spacers between the sheets to keep grout lines consistent. Tile edging gives the project a professional finish – ask your distributor about your edging options.
Note: Type-1 mastic cannot be used on existing tile. You should use construction adhesive when installing Six3Tile over existing tile.
So, there you have it – a quick overview of Six3Tile Backsplash Pro Kits, what makes them different, and how they can benefit your business. For more information, check out our resources, FAQs, or contact us directly. We look forward to making you a believer. Happy tiling!
.jpg)
sm.jpg)
sm.jpg)